
Under floor fresh water tank removal
4 posters
The Auto-Sleeper Motorhome Owners Forum (ASOF) :: Auto-Sleeper Motorhome Forums :: Auto-Sleeper "Coachbuilt Motorhomes" Forum
Page 1 of 1

 Under floor fresh water tank removal
![]() by gassygassy Thu Dec 28, 2023 11:56 pm
by gassygassy Thu Dec 28, 2023 11:56 pm
Maybe you want to fit a Shurflo pump under a sofa bed, and want to remove the Whale submersible pump in the fresh water tank. Or maybe you want to fit a replacement Whale submersible because yours has gone wrong. Or maybe, as I did, you want to find out why when you fill the tank, water is issuing from between the top of the tank and the camper's wooden floor. You will need to get the vehicle up off the ground as high as you can, so that the tank can be lowered down at an angle, if like mine yours has an exhaust pipe immediately below it.
Here's how to do it. I spent what ended up as 4 hours dismantling and replacing things inside the camper, all of which was unnecessary. Looking under the seat at the pipes coming in from the floor I thought that the connectors on the floor went directly into the top of the tank. They don't. They go to one end of the tank so you disconnect them there. Here's how:
1) Drain the tank.
2) Before undoing the tank retaining straps you will need to disconnect the following:
a) two 12mm water pipes at one end: see photo
b) five wires from the level sensor screws
c) the heater pad wires
d) the black concertina 40mm fill pipe
e) the blue 15mm vent pipe - disconnect it from any zip ties holding it in place.
f) Remove the tank drain pipe.
g) optional - remove the 15mm blue plastic ventilation pipe.
h) disconnect the Whale pump supply wire -it's a two core white mains type of wire and easily identifyable. If you are not fitting another Whale pump the feed end can just be left insulated and tucked away where it won't do any harm.
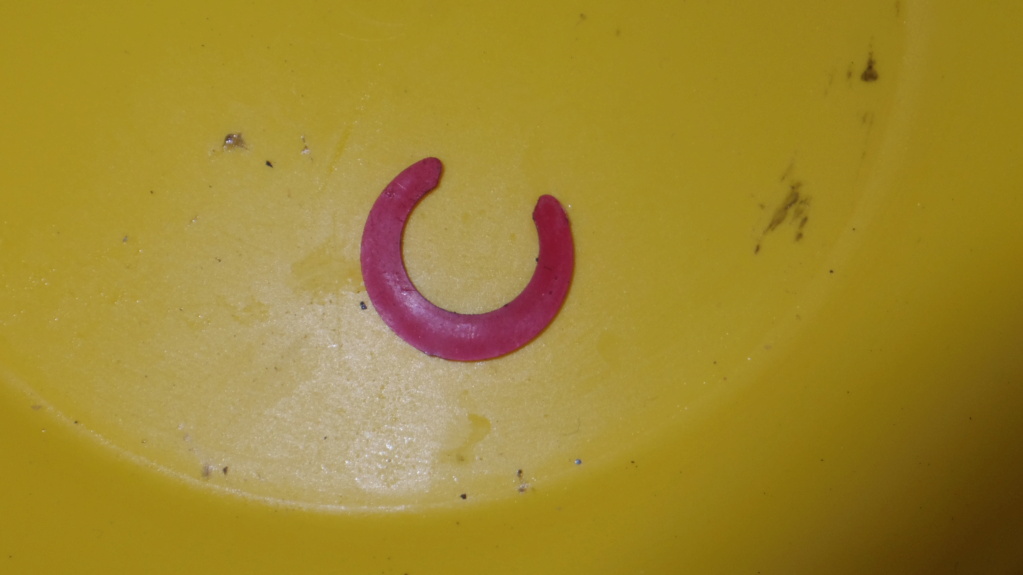
3) the 12mm water pipes. The lower one runs from the submersible pump in the tank and the top one is the feed inlet from the external Whale filler point. You will see these red horse shoe clips where the pipe enters the black moulded coupler. Spring these clips out, then push the black ring adjacent to the pipe, inwards towards the black moulded coupler. Then you can pull the pipe away from the coupler.

4) Next you will have to cut the five wires from the water level sensor screws. You can't unscrew them, they just have nuts inside which means tthey just rotate and don't undo unless you are holding the nut in place, which you can't do without sticking your hand inside the tank. The cable with these wires disappears into a wrapped-up loom so I decided to just cut them and re-join them later.
5) Cut the heater pad wires. I decided that when I was 14 at school I would have used a better method of joining wires just in front of a road wheel than AutoSleeper does. It's pathetic them using blade connectors which have zero water resistance. In 1969 Honda motorbikes had waterproof wiring connectors and yet A/S just choose to save a tiny fraction of a penny by not using automotive grade electrics. I decided that I can connect wires better than that so I just cut them. You can think as I did that the heater pad is a waste of time anyway and not worth wasting electricity on, specially as half the heat from the pad goes straight to the steel tank support so it is wasted, and the other half of the heat just dissipates into the atmosphere, leaving diddly squat to melt the ice in the water tank.
6)) at the other end of the tank you will have to cut through the 40mm black concertina fill pipe. One end runs up through the floor and the tank end is held firmly in place by black adhesive. You can't remove the pipe so you have to cut it. There's no metal in it, just cut it with a craft knife. You can re-join the pipe quite easily later when you refit the tank.

Optional: remove the 28mm blue water drain pipe that leads to the drain tap. Sorry I don't have a photo for that, but it is obvious how to remove it if you want to. I left it in position and removed the drain tap from the pipe.
Also optional: remove the blue plastic ventilation hose pipe that runs from the top of the tank across in my case, the gas tank. Or you can leave it in place, whatever is easiest for you. I had to cut a zip tie to release it.
6) Next you can remove the steel retaining straps that hold the tank to the floor. By now all the water is out and so it doesn't weigh much. You don't need a second person or axle stand to support it. First you need to drill out two pop rivets holding one of the steel straps to the side skirting of the motorhome. Then using a 17mm socket, extension bar and rachet, undo the four nuts holding the straps to the floor. Collect the four nuts and washers and keep them in a safe place along with the two red horse shoe plastic clips. The tank will probably stick to the studs and will need wiggling to get it down. Lower it towards the rear wheel (in my case, a Bourton) and get it out from under the vehicle. Crawl out yourself.
My tank was leaking at the top, and I wanted at the same time to remove the Whale submersible pump and fit a Shurflo inside the camper. I found that the leak from the top was where the inspection cap had not been fitted properly. Thanks for that, AutoSleeper. The rubber gasket had been fitted twisted allowing water to escape. see photo showing the thick, soft rubber seal.

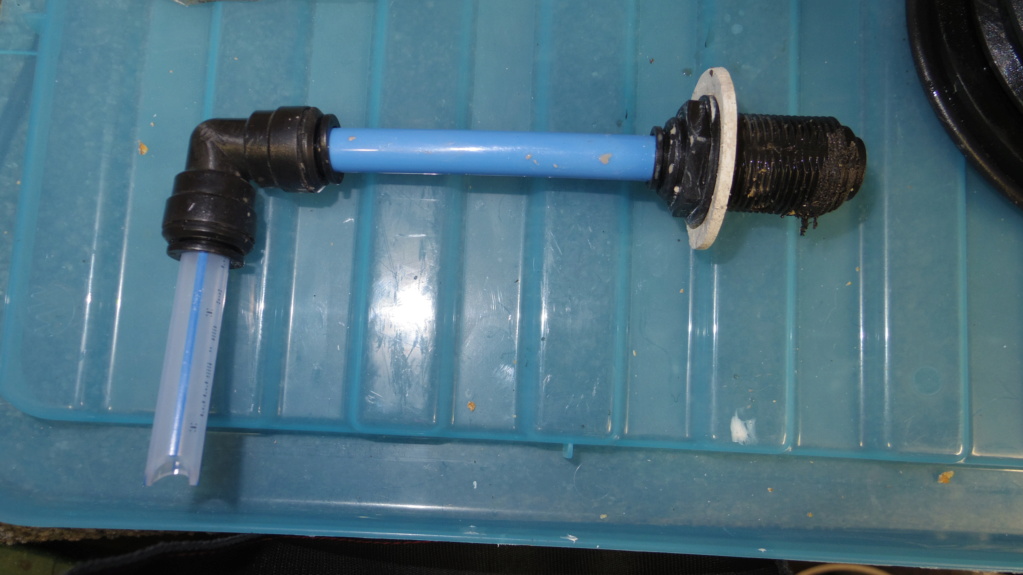
7) With the inspection plate removed you can reach inside the tank and hold the fitting where the Whale pump is attached to the outlet fitting. Unscrew the nut outside the tank while holding the fitting inside. Remove the Whale pump and either replace it with a new pump if you wish, or discard it (better still, if it's working sell it on ebay!). You will need to cut the white wire to the Whale pump in order to get it through the small hole in the tank. If you are fitting a Shurflo you don't need the Whale any more so you need to replace it with a new piece of standard motorhome translucent / blue stripe 12mm pipe, about 50mm long so that the end of the new pipe just touches the floor of the tank. Cut the pipe to the length you think, then offer the assembly into the tank to check the pipe touches the tank floor at right angles. When you have got the length right, cut two V notches in the bottom of the pipe as shown to prevent the pipe suctioning itself to the tank floor. You will need a new 90 degree 12mm connector, as shown. Be careful when fitting these connectors, and when refitting the others you have previously removed. When you push the pipe into the connector you will feel a point of resistance. That is not IN. It will leak and possibly the pipe will jump out. After the first point of resistance push as hard as you can and you will feel another click, when the pipe pushes fully home. Then it is going past the teeth of the pipe gripper and will not come out again unless you push the moveable ring in towards the fitting, and then pull the pipe out.
When replacing the black plastic fitting in the tank I smeared some non setting butyl rubber sealing compound around the joint to be sure of no leaks. Refit the fitting and tighten the retaining nut on the outside while holding the fitting and pipes inside in their correct orientation. Check that the new down pipe touches the bottom of the tank and is not at a funny angle or it won't suck all the water out.
8) Replace the inspection cover ring, making sure that the soft rubber seal is seated properly. I smeared mine with plumber's silicone grease for additional sealing and ease of assembly without crimping anything.
9) Collect the 17mm socket, extension and rachet you used to remove the tank support nuts. Take the tank back to the vehicle and offer it up with one of the straps around it. This is the fiddly bit but I didn't find it too difficult. Holding the tank and strap with one hand, or your knee, fit the strap to one stud, and fit one nut by the other hand - it only needs to grab on to the thread a bit before you need to use the socket. Don't do it up tight. Repeat with the other three nuts and washers, and then do them up as tight as you can. The correct torque is 'as tight as you can plus a grunt'.
10) Refit the water pipes, remembering to push past the first point of resistance till you get the second 'click'. Replace the red plastic horse shoe clips.
11) Reconnect the water level sensor wires. They are all different colours so it's not difficult to match them up. I chose to use standard crimp connectors thus: Strip 10mm of insulation off each wire. Bend the copper conductors back over the plastic, and paint them with silicone grease. This will stop corrosion inside the connector. Push the wire into the connector - I found that using the small sized red connectors was fine. Crimp the wire in place. I use a professional grade ratcheting crimp tool that won't release the connector until it is fully crimped. The reason for bending the copper wire back over the plastic outer is that it will grip better inside the connector. After the wires are reconnected I painted silicone grease as much as I could into the open ends of the connectors. Then I painted silicone grease onto the screw heads of the level sensor screws. (see photo).
12) at the other end of the tank, refit the ventilation pipe and the 28mm drain pipe if you have removed them.
13) The 40mm black concertina fill pipe now needs to be reconnected and it just so happens that a 32mm solvent coupler outside diameter is the same as the inside diameter of the black pipe. Go to your local plumber and get the coupler plus two jubilee clips. Fit two jubilee clips to the pipe ends, smear some of the butyl sealant over the outside of the coupler and push it into the pipe, pushing the two halves of the pipe together till they meet, and tighten the jubilee clips. This is the coupler, from Screwfix, or you can get the same thing from the likes of B&Q or any plumbers merchant:
https://www.screwfix.com/p/floplast-straight-couplers-32mm-x-32mm-white-5-pack/38660
You don't need 5 of course, so if you can, just get one.
14 Don't forget the little hole that the Whale supply wire came out of the tank. I shoved a red wall plug into the hole and smeared sealant all over it. If you are fitting a new Whale pump obviously you will need to feed its wire through this hole and reconnect it to the vehicle wiring.
Fill the tank part way, and check underneath that there are no leaks. Check the operation of the pump and again check for leaks.
Lower the vehicle and have a cup of hot cocoa (since it is 28 December when I am writing this and it is blowing a hooley).
In my case, get back underneath and tighten some of those Jubilee clips till the drips stop!
Here's how to do it. I spent what ended up as 4 hours dismantling and replacing things inside the camper, all of which was unnecessary. Looking under the seat at the pipes coming in from the floor I thought that the connectors on the floor went directly into the top of the tank. They don't. They go to one end of the tank so you disconnect them there. Here's how:
1) Drain the tank.
2) Before undoing the tank retaining straps you will need to disconnect the following:
a) two 12mm water pipes at one end: see photo
b) five wires from the level sensor screws
c) the heater pad wires
d) the black concertina 40mm fill pipe
e) the blue 15mm vent pipe - disconnect it from any zip ties holding it in place.
f) Remove the tank drain pipe.
g) optional - remove the 15mm blue plastic ventilation pipe.
h) disconnect the Whale pump supply wire -it's a two core white mains type of wire and easily identifyable. If you are not fitting another Whale pump the feed end can just be left insulated and tucked away where it won't do any harm.
3) the 12mm water pipes. The lower one runs from the submersible pump in the tank and the top one is the feed inlet from the external Whale filler point. You will see these red horse shoe clips where the pipe enters the black moulded coupler. Spring these clips out, then push the black ring adjacent to the pipe, inwards towards the black moulded coupler. Then you can pull the pipe away from the coupler.
4) Next you will have to cut the five wires from the water level sensor screws. You can't unscrew them, they just have nuts inside which means tthey just rotate and don't undo unless you are holding the nut in place, which you can't do without sticking your hand inside the tank. The cable with these wires disappears into a wrapped-up loom so I decided to just cut them and re-join them later.
5) Cut the heater pad wires. I decided that when I was 14 at school I would have used a better method of joining wires just in front of a road wheel than AutoSleeper does. It's pathetic them using blade connectors which have zero water resistance. In 1969 Honda motorbikes had waterproof wiring connectors and yet A/S just choose to save a tiny fraction of a penny by not using automotive grade electrics. I decided that I can connect wires better than that so I just cut them. You can think as I did that the heater pad is a waste of time anyway and not worth wasting electricity on, specially as half the heat from the pad goes straight to the steel tank support so it is wasted, and the other half of the heat just dissipates into the atmosphere, leaving diddly squat to melt the ice in the water tank.
6)) at the other end of the tank you will have to cut through the 40mm black concertina fill pipe. One end runs up through the floor and the tank end is held firmly in place by black adhesive. You can't remove the pipe so you have to cut it. There's no metal in it, just cut it with a craft knife. You can re-join the pipe quite easily later when you refit the tank.
Optional: remove the 28mm blue water drain pipe that leads to the drain tap. Sorry I don't have a photo for that, but it is obvious how to remove it if you want to. I left it in position and removed the drain tap from the pipe.
Also optional: remove the blue plastic ventilation hose pipe that runs from the top of the tank across in my case, the gas tank. Or you can leave it in place, whatever is easiest for you. I had to cut a zip tie to release it.
6) Next you can remove the steel retaining straps that hold the tank to the floor. By now all the water is out and so it doesn't weigh much. You don't need a second person or axle stand to support it. First you need to drill out two pop rivets holding one of the steel straps to the side skirting of the motorhome. Then using a 17mm socket, extension bar and rachet, undo the four nuts holding the straps to the floor. Collect the four nuts and washers and keep them in a safe place along with the two red horse shoe plastic clips. The tank will probably stick to the studs and will need wiggling to get it down. Lower it towards the rear wheel (in my case, a Bourton) and get it out from under the vehicle. Crawl out yourself.
My tank was leaking at the top, and I wanted at the same time to remove the Whale submersible pump and fit a Shurflo inside the camper. I found that the leak from the top was where the inspection cap had not been fitted properly. Thanks for that, AutoSleeper. The rubber gasket had been fitted twisted allowing water to escape. see photo showing the thick, soft rubber seal.
7) With the inspection plate removed you can reach inside the tank and hold the fitting where the Whale pump is attached to the outlet fitting. Unscrew the nut outside the tank while holding the fitting inside. Remove the Whale pump and either replace it with a new pump if you wish, or discard it (better still, if it's working sell it on ebay!). You will need to cut the white wire to the Whale pump in order to get it through the small hole in the tank. If you are fitting a Shurflo you don't need the Whale any more so you need to replace it with a new piece of standard motorhome translucent / blue stripe 12mm pipe, about 50mm long so that the end of the new pipe just touches the floor of the tank. Cut the pipe to the length you think, then offer the assembly into the tank to check the pipe touches the tank floor at right angles. When you have got the length right, cut two V notches in the bottom of the pipe as shown to prevent the pipe suctioning itself to the tank floor. You will need a new 90 degree 12mm connector, as shown. Be careful when fitting these connectors, and when refitting the others you have previously removed. When you push the pipe into the connector you will feel a point of resistance. That is not IN. It will leak and possibly the pipe will jump out. After the first point of resistance push as hard as you can and you will feel another click, when the pipe pushes fully home. Then it is going past the teeth of the pipe gripper and will not come out again unless you push the moveable ring in towards the fitting, and then pull the pipe out.
When replacing the black plastic fitting in the tank I smeared some non setting butyl rubber sealing compound around the joint to be sure of no leaks. Refit the fitting and tighten the retaining nut on the outside while holding the fitting and pipes inside in their correct orientation. Check that the new down pipe touches the bottom of the tank and is not at a funny angle or it won't suck all the water out.
8) Replace the inspection cover ring, making sure that the soft rubber seal is seated properly. I smeared mine with plumber's silicone grease for additional sealing and ease of assembly without crimping anything.
9) Collect the 17mm socket, extension and rachet you used to remove the tank support nuts. Take the tank back to the vehicle and offer it up with one of the straps around it. This is the fiddly bit but I didn't find it too difficult. Holding the tank and strap with one hand, or your knee, fit the strap to one stud, and fit one nut by the other hand - it only needs to grab on to the thread a bit before you need to use the socket. Don't do it up tight. Repeat with the other three nuts and washers, and then do them up as tight as you can. The correct torque is 'as tight as you can plus a grunt'.
10) Refit the water pipes, remembering to push past the first point of resistance till you get the second 'click'. Replace the red plastic horse shoe clips.
11) Reconnect the water level sensor wires. They are all different colours so it's not difficult to match them up. I chose to use standard crimp connectors thus: Strip 10mm of insulation off each wire. Bend the copper conductors back over the plastic, and paint them with silicone grease. This will stop corrosion inside the connector. Push the wire into the connector - I found that using the small sized red connectors was fine. Crimp the wire in place. I use a professional grade ratcheting crimp tool that won't release the connector until it is fully crimped. The reason for bending the copper wire back over the plastic outer is that it will grip better inside the connector. After the wires are reconnected I painted silicone grease as much as I could into the open ends of the connectors. Then I painted silicone grease onto the screw heads of the level sensor screws. (see photo).
12) at the other end of the tank, refit the ventilation pipe and the 28mm drain pipe if you have removed them.
13) The 40mm black concertina fill pipe now needs to be reconnected and it just so happens that a 32mm solvent coupler outside diameter is the same as the inside diameter of the black pipe. Go to your local plumber and get the coupler plus two jubilee clips. Fit two jubilee clips to the pipe ends, smear some of the butyl sealant over the outside of the coupler and push it into the pipe, pushing the two halves of the pipe together till they meet, and tighten the jubilee clips. This is the coupler, from Screwfix, or you can get the same thing from the likes of B&Q or any plumbers merchant:
https://www.screwfix.com/p/floplast-straight-couplers-32mm-x-32mm-white-5-pack/38660
You don't need 5 of course, so if you can, just get one.
14 Don't forget the little hole that the Whale supply wire came out of the tank. I shoved a red wall plug into the hole and smeared sealant all over it. If you are fitting a new Whale pump obviously you will need to feed its wire through this hole and reconnect it to the vehicle wiring.
Fill the tank part way, and check underneath that there are no leaks. Check the operation of the pump and again check for leaks.
Lower the vehicle and have a cup of hot cocoa (since it is 28 December when I am writing this and it is blowing a hooley).
In my case, get back underneath and tighten some of those Jubilee clips till the drips stop!
_________________
complexity is the enemy of reliability

gassygassy- Donator

-

Posts : 1165
Joined : 2019-06-21
Location : Lutterworth
Auto-Sleeper : 1 Bourton 1 Polensa
Vehicle Year : various
BobK, oddjob, Martyn Holder, Skizzydo, Nangie and IanH like this post
Re: Under floor fresh water tank removal
![]() by IanH Fri Dec 29, 2023 9:02 am
by IanH Fri Dec 29, 2023 9:02 am
What a great post, IMHO a moderator should put this into Members Factsheets.

IanH- Donator
-
Posts : 7997
Joined : 2020-05-04
Location : NORTH WALSHAM
Auto-Sleeper : Executive
Vehicle Year : 2002
Fontie, oddjob, Lorriane, Teckguy, gassygassy and Nangie like this post
Re: Under floor fresh water tank removal
![]() by gassygassy Fri Dec 29, 2023 10:28 am
by gassygassy Fri Dec 29, 2023 10:28 am
Thanks Ian. Actually this was the start of my problems. The real underlying reason for removing the tank was that I have fitted an extra 25 litre tank under one of the seats inside the habitation area and so I needed to modify the pipework of the main tank. This poses all sorts of problems, one being that the under floor tank now needs a vent hose taking the displaced air up and out in order that the incoming water doesn't pressurise the underfloor tank. I thought that the 40mm fill pipe would allow the air out, but strangely it doesn't. I think an air bubble forms at the top of the original tank because there is no vent pipe now I have blocked off the original. The 40mm fill pipe isn't acting as a vent as well as a fill. So I now have to reconnect the under floor tank vent to a new pipe running up inside above the water level of the 25 litre tank, and then outside somehow. Either back down through the floor, or join it to an existing vent pipe. There is one, next to the main water inlet so I will connect it to that - but as I say it will have to connect higher than the new tank water level. That's today's job. I have already decided that adding another 25 litre tank is not worth the trouble!
Strangely yesterday I also discovered that on this Bourton, A/S could have fitted a much bigger tank anyway. I got underneath and saw two handbrake cables running from the rear wheels forwards to a central mounting point on the chassis. This is normal I thought, but they get in the way of fitting a bigger tank. then yesterday I noticed that where the two cables meet in the centre they are just terminated on a fat plastic block. I wondered where the single cable was, that would normally connect these two cables to the handbrake. Then I went 'DOH'! to myself. It has an electric brake and no hand brake lever. So why would they go and fit two handbrake cables when there is no hand brake lever?
Answers on a postcard . . . .
_________________
complexity is the enemy of reliability
gassygassy- Donator
-
Posts : 1165
Joined : 2019-06-21
Location : Lutterworth
Auto-Sleeper : 1 Bourton 1 Polensa
Vehicle Year : various
Re: Under floor fresh water tank removal
![]() by Caraman Sun Dec 31, 2023 9:34 pm
by Caraman Sun Dec 31, 2023 9:34 pm
All good stuff. To be fair to A-S I think its Sargent who supply spade connections between the harness and the heater pads and also the level sensors. And yes, they are very prone to water ingress as I have found. I didn't replace my spade connectors with crimps but I did reposition and seal them as best I could so they they would remain dry - so far so good. The heater pad manufacturer claims most of the heat goes into the tank as their flat foil heating elements are uppermost and pressed against the tank. They acknowledge that adding insulation to the base of the tank below the heaters will improve the heaters' effectiveness which is easy to do and what I have done.

Caraman- Member

-
Posts : 3494
Joined : 2019-04-19
Location : SALISBURY
Auto-Sleeper : Nuevo
Vehicle Year : 2019
oddjob and Teckguy like this post
Under floor fresh water tank removal
![]() by Appretice Fri Jan 12, 2024 6:02 pm
by Appretice Fri Jan 12, 2024 6:02 pm
Hello GassyGassy
Thanks for a very comprehensive commentary on your experiences of water tank removal and replacement.
I too have a 2019 Bourton and I've had to replace the Whale submersible. Fortunately I was able to do it by removing the large drain cover in the base of the tank and reaching in at arm's length. I had to disconnect the cable connectors to the pump and I found them to be less than secure and satisfactory. I replaced them with the crimped type you describe.
You don't say anything about fitting an alternative pump Shurflo or similar. I might have done that had there been enough space under the bed to accommodate said Shurflo (I'm a fan). If you fitted an alternative I'd be pleased to know of your solution.
Best
John

Appretice- Member
-
Posts : 11
Joined : 2022-06-08
Location : West Sussex
Auto-Sleeper : Bourton
Vehicle Year : 2019
Re: Under floor fresh water tank removal
![]() by gassygassy Sat Jan 13, 2024 11:28 am
by gassygassy Sat Jan 13, 2024 11:28 am
The coldwater tank on my Bourton had the big inspection cover on the top so I had to remove it to gain access to the whale pump.
I don't know if you have the 4 berth version with the overcab double bed as I have. If you have, I relocated the battery under the rear seat by rotating it through 90 degrees and moving it as far rearwards as posible. This leaves enough space to fit the Shurflo forward of the battery. I would post a picture now, but my internet is down and I'm at the library and don't have a photo on my laptop now. Obviously some pipework is necessary. I'll get around to doing a 'how to' thread later some time but now I have some important stuff to get on with.
I don't know if you have the 4 berth version with the overcab double bed as I have. If you have, I relocated the battery under the rear seat by rotating it through 90 degrees and moving it as far rearwards as posible. This leaves enough space to fit the Shurflo forward of the battery. I would post a picture now, but my internet is down and I'm at the library and don't have a photo on my laptop now. Obviously some pipework is necessary. I'll get around to doing a 'how to' thread later some time but now I have some important stuff to get on with.
_________________
complexity is the enemy of reliability
gassygassy- Donator
-
Posts : 1165
Joined : 2019-06-21
Location : Lutterworth
Auto-Sleeper : 1 Bourton 1 Polensa
Vehicle Year : various
Re: Under floor fresh water tank removal
![]() by gassygassy Wed Jan 17, 2024 4:20 pm
by gassygassy Wed Jan 17, 2024 4:20 pm
Hi John, sorry for the late reply.Appretice wrote:.......
You don't say anything about fitting an alternative pump Shurflo or similar. I might have done that had there been enough space under the bed to accommodate said Shurflo (I'm a fan). If you fitted an alternative I'd be pleased to know of your solution.
Best
John
I hope I can attach a photo which should explain how the Shurflo is fitted. Remove the LB and its base plastic trough thing - I can't think of the right term!. Fit the Shurflo as shown in the photo, for which you will need a couple of metres of water pipe, some bends and couplers and clips. Refit the battery at right angles to its previous location, further rearwards towards the wheel arch. I fitted a larger A/H battery which fits exactly, precisely with two gnat's hairs gap each end so if you want a higher power battery, it is possible. I have the MPPT solar regulator fixed to the outside wall as shown in the photo. Everything fits, everything is accessible.
If I were designing the water system I wouldn't do it how A/S do, I would use several metres less of water pipe saving money and labour. Their design sends the water all round the houses adding resistance to water flow and therefore less flow at the taps.

_________________
complexity is the enemy of reliability
gassygassy- Donator
-
Posts : 1165
Joined : 2019-06-21
Location : Lutterworth
Auto-Sleeper : 1 Bourton 1 Polensa
Vehicle Year : various
» Fresh water tank
» Fresh water and Grey water tank
» fresh water tank
» Fresh water tank
» Fresh Water tank
» Fresh water and Grey water tank
» fresh water tank
» Fresh water tank
» Fresh Water tank
The Auto-Sleeper Motorhome Owners Forum (ASOF) :: Auto-Sleeper Motorhome Forums :: Auto-Sleeper "Coachbuilt Motorhomes" Forum
Page 1 of 1
Permissions in this forum:
You cannot reply to topics in this forum